Deploying a Rust application on Patr
Rust is a modern systems programming language designed for performance and safety. It has been gaining popularity in recent years due to its powerful features, including its memory safety guarantees and concurrency model.
Prerequisites - What you'll need
- A Patr account (You can sign up for one here)
- Docker installed on your machine (or a similar containerization technology). You can get Docker here
Creating a Patr Container Repository
In order to create a Deployment that runs a particular image, we first need to create a Container Repository on Patr. In order to create a Container Repository on Patr's Container Registry, navigate to the Container Registry section in the side-nav, and click on the Create Repository button.


In the Repository Name field, enter the name of the repository you want to create (for example: backend). This can be anything you use to identify the image, but only valid container image name characters are allowed (no spaces, only lowercase alphanumeric characters and hyphens, and cannot begin or end with a hyphen). Your repository will get created of the following format: registry.patr.cloud/<your-workspace-id>/<repository-name>.
Once created (for this example, let's call it registry.patr.cloud/123456789/backend), you can push your container to your repository from the CLI.
Setting up the Dockerfile
This example uses a Dockerfile and Docker, but you're free to use any containerization technology.
Write the following contents to a file called Dockerfile in the root of the codebase:
# Build stage
FROM rust:1 as build

WORKDIR /app

# Install musl libc and other build dependencies
RUN apt-get update && apt-get install -y musl-tools libssl-dev && rustup target add x86_64-unknown-linux-musl

# Copy over the Cargo.toml and build dependencies
COPY Cargo.toml .
COPY Cargo.lock .
# Create build cache to speed up subsequent builds
RUN mkdir src && \
    echo "fn main() {println!(\"dummy\");}" > src/main.rs && \
    cargo build --release --target=x86_64-unknown-linux-musl && \
    rm -rf src target

# Copy the source code and build the application
COPY . .
RUN cargo build --release --target=x86_64-unknown-linux-musl

# Runtime stage
FROM alpine:latest

# Install runtime dependencies
RUN apk add --no-cache libgcc libssl1.1

# Copy the built binary and set the entrypoint
COPY --from=builder /app/target/x86_64-unknown-linux-musl/release/my_app /usr/local/bin/my_app
ENTRYPOINT ["/usr/local/bin/my_app"]
Replace my_app with your application name.
Building the container
Ensure that Docker is running in your system. Once Docker is running, run the following commands:
docker build . -t registry.patr.cloud/123456789/backend:stable
Note: In case you face any permission issue, try running the command with sudo docker <command> instead of docker <command>.
Replace registry.patr.cloud/123456789/backend with the repository name you just created and stable with the tag you want to use (you can use any tag name). We can use multiple tags for different Deployments to maintain separate Deployments for development, staging, production, etc.
Pushing the container
Once you have an image tagged, you can push it to Patr's Container Registry by running the following commands:
docker login registry.patr.cloud -u <username>
docker push registry.patr.cloud/123456789/backend:stable
Replace <username> with your Patr username, and when prompted for your password, use the password that you use to login to Patr.
Creating the Deployment
Once your image is pushed, you can then create the Deployment. On Patr, under Infrastructure, navigate to the Deployments section.

Click on the Create Deployment button and enter the following details:

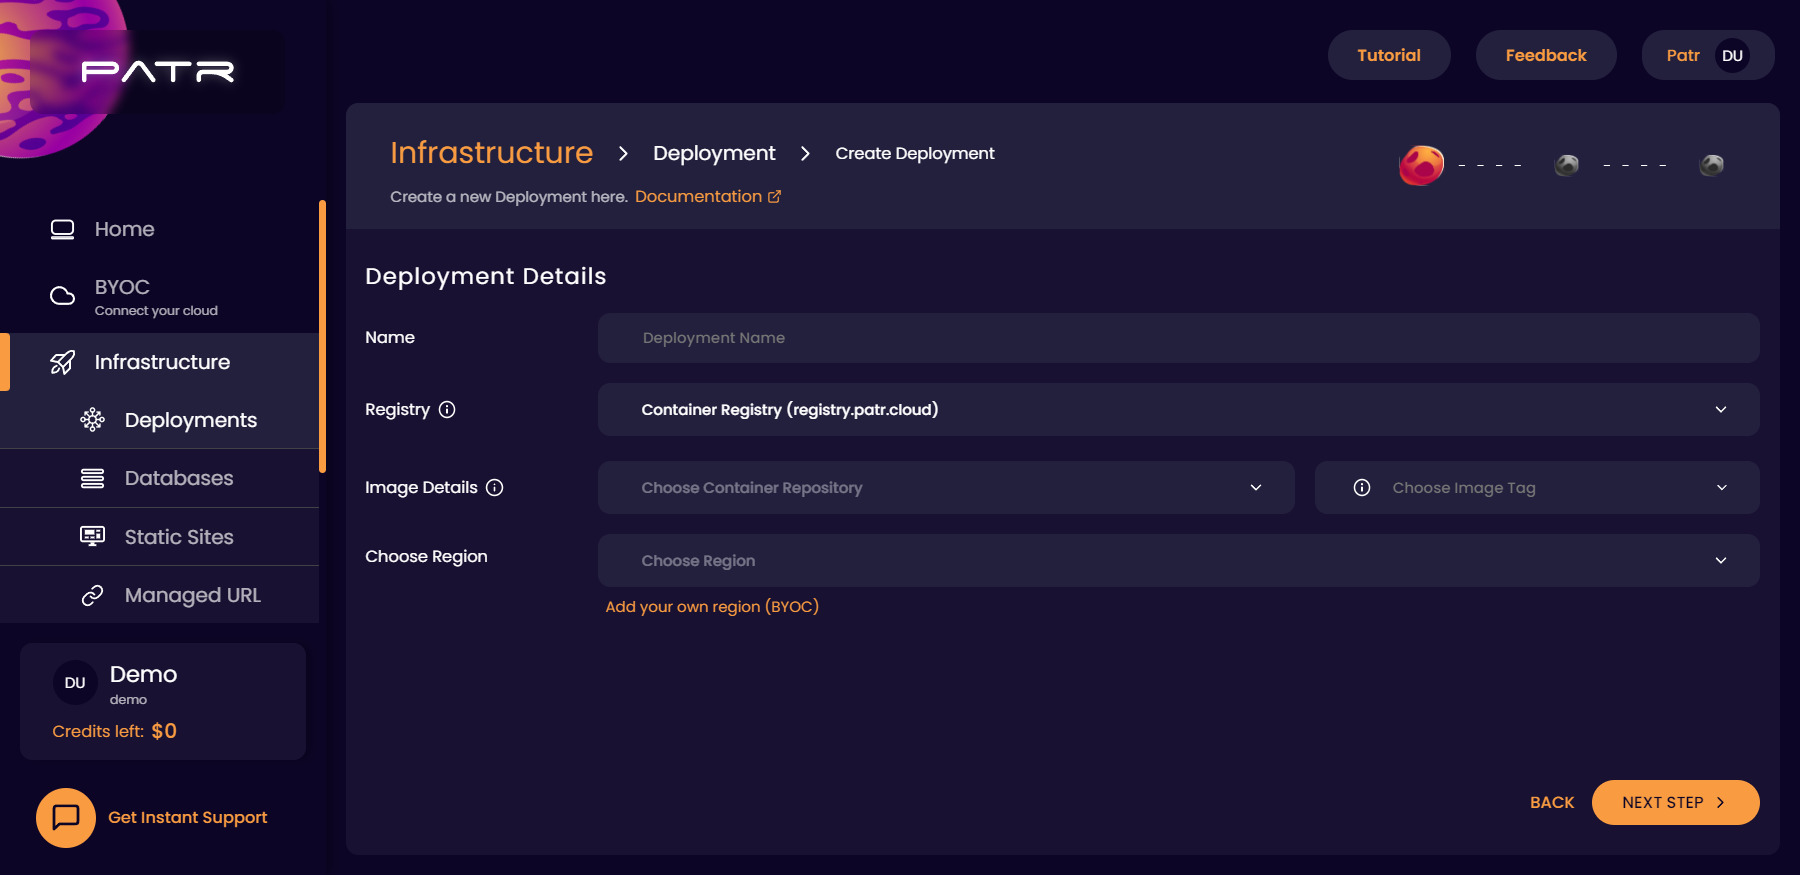
- Name: A user-friendly name used to identify the deployment
- Registry: Select Patr Registry
- Image Repository: Choose the container repository that you just created. In this example, this will be
backend - Tag: Choose the tag if the repository to deploy. In this example, we will use
stable. - Region: This is the region that your Deployment will run on. We provide multiple regions for you to be able to deploy to out of the box. However, if you'd like your deployments to run on your own cloud account, you can connect your BYOC account to Patr, and choose your BYOC region over here.
Click on the Next button to move to the next screen.
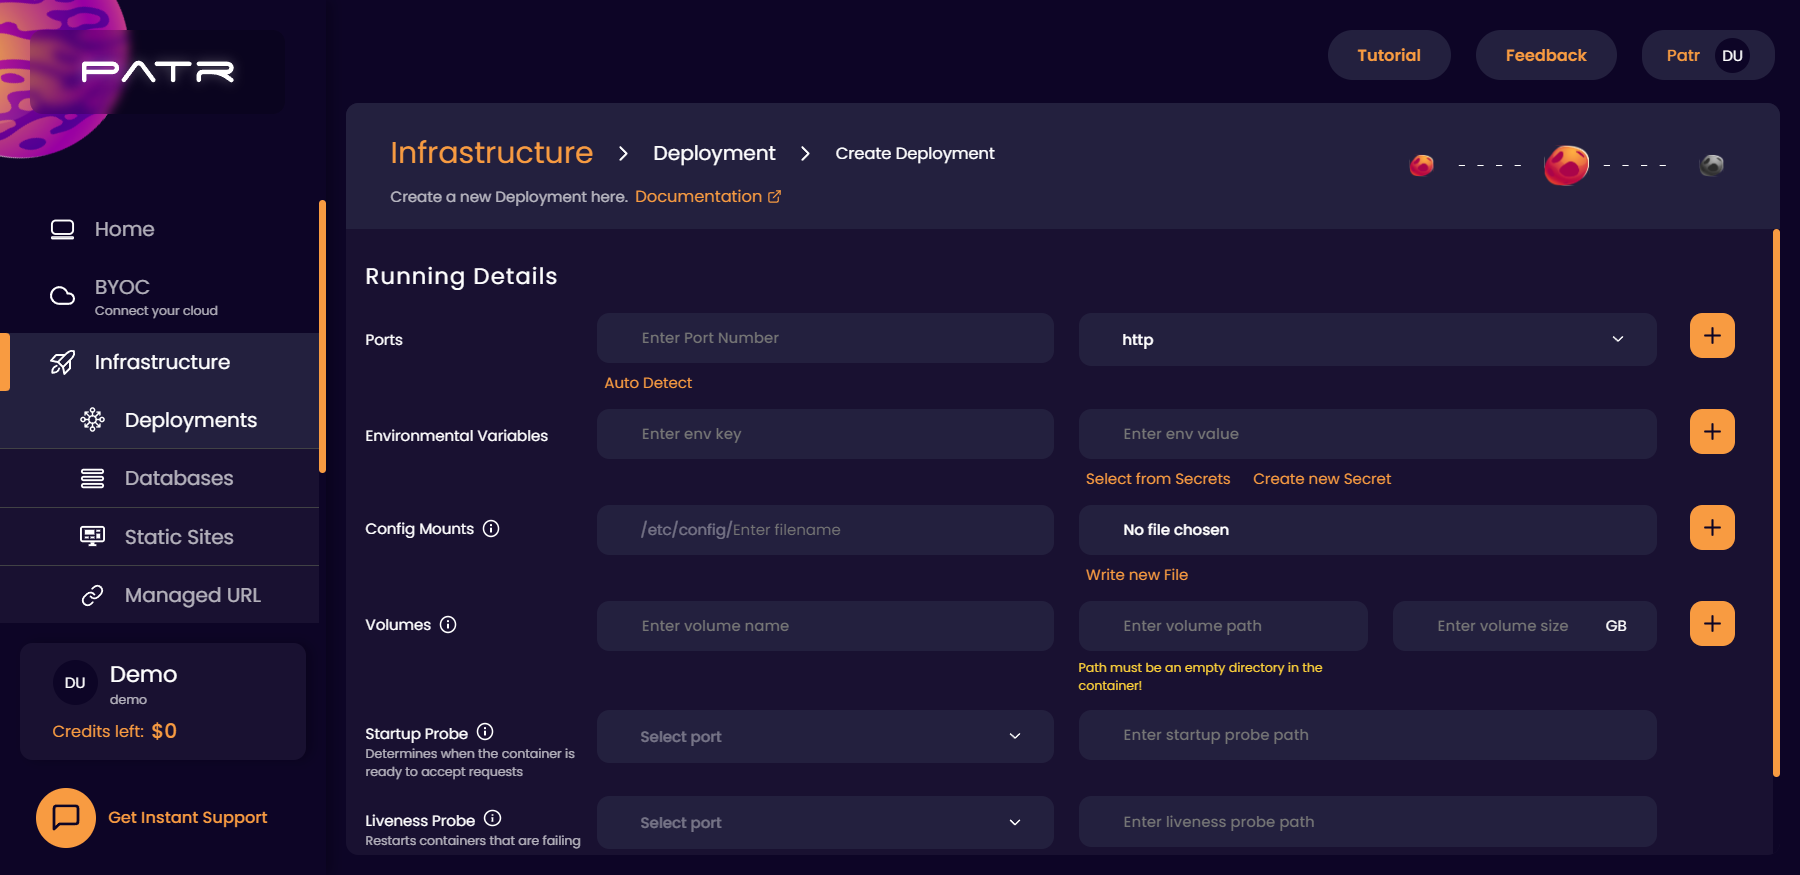
- Ports: The port your container is listening on, for HTTP connections. In this example, this would be 8000. You need to expose at least one port for your Deployment.
- Environment Variables: These are the environment variables that will be set to your container, and can be customized at any time. Any key and value you set over here will be set directly to your container.
- Config Mounts: In situations where you have config files that change regularly, you can use config mounts. For this example, we have none, so this can be left empty.
- Volumes: Since any deployment running on Patr is a container, any files stored in it are lost when the container restarts. In order to persist data across restarts, you can store your files in a Volume. For this example, this can be left empty. You can read more about Volumes in our Data Persistence Guide
- Startup Probe: A startup probe can be used to notify Patr when your application is ready to accept connections. For this example, this can be left empty.
- Liveness Probe: Similar to a startup probe, a Liveness Probe checks running containers to see if they are active. For this example, this can be left empty.
You can read more on these values in our Deployment Guide.
Click on the Next button to move to the next screen.
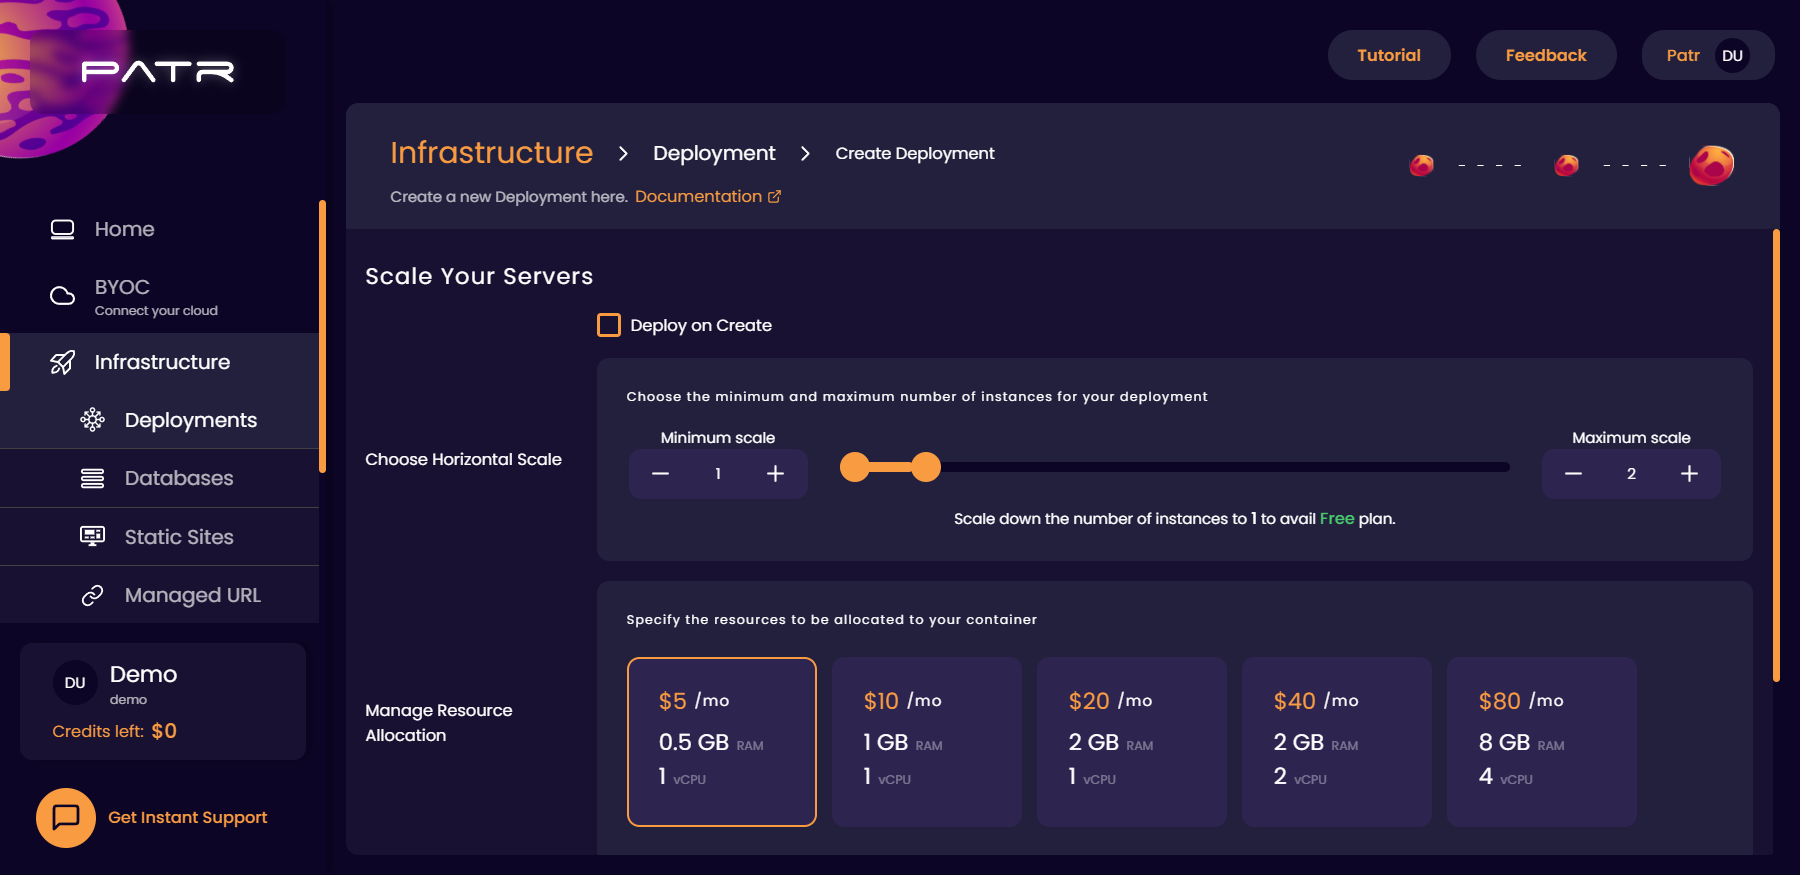
- Deploy on Push: If we want the Deployment to automatically update when we push to
registry.patr.cloud/123456789/backend:stable, we can check this option. - Deploy on Create: Check this option if you want Patr to deploy the container right after creation. Otherwise, you can start the Deployment once you have all the data ready.
- Horizontal Scale: Patr can automatically scale your Deployment up and down based on the amount of traffic you have. For this example, we will leave this at default.
- Resource Allocation: This is the maximum amount CPU and RAM that will be allocated to your container. Any allocation beyond this limit will not be allowed by Patr. You can use this to specify the amount of CPU and RAM that is required by your container to run. In case of high traffic, your container will be automatically scaled up as per your Horizontal Scale settings.
You can see your estimated costs of the Deployment in the "Estimated Cost" section. This range is based on how much your Deployment scales up and down, within a given month. You can learn more about the pricing of the Deployments in the Pricing section.

Once you click on the Create button, your Deployment will then be created and will be visible on your Deployments Dashboard.
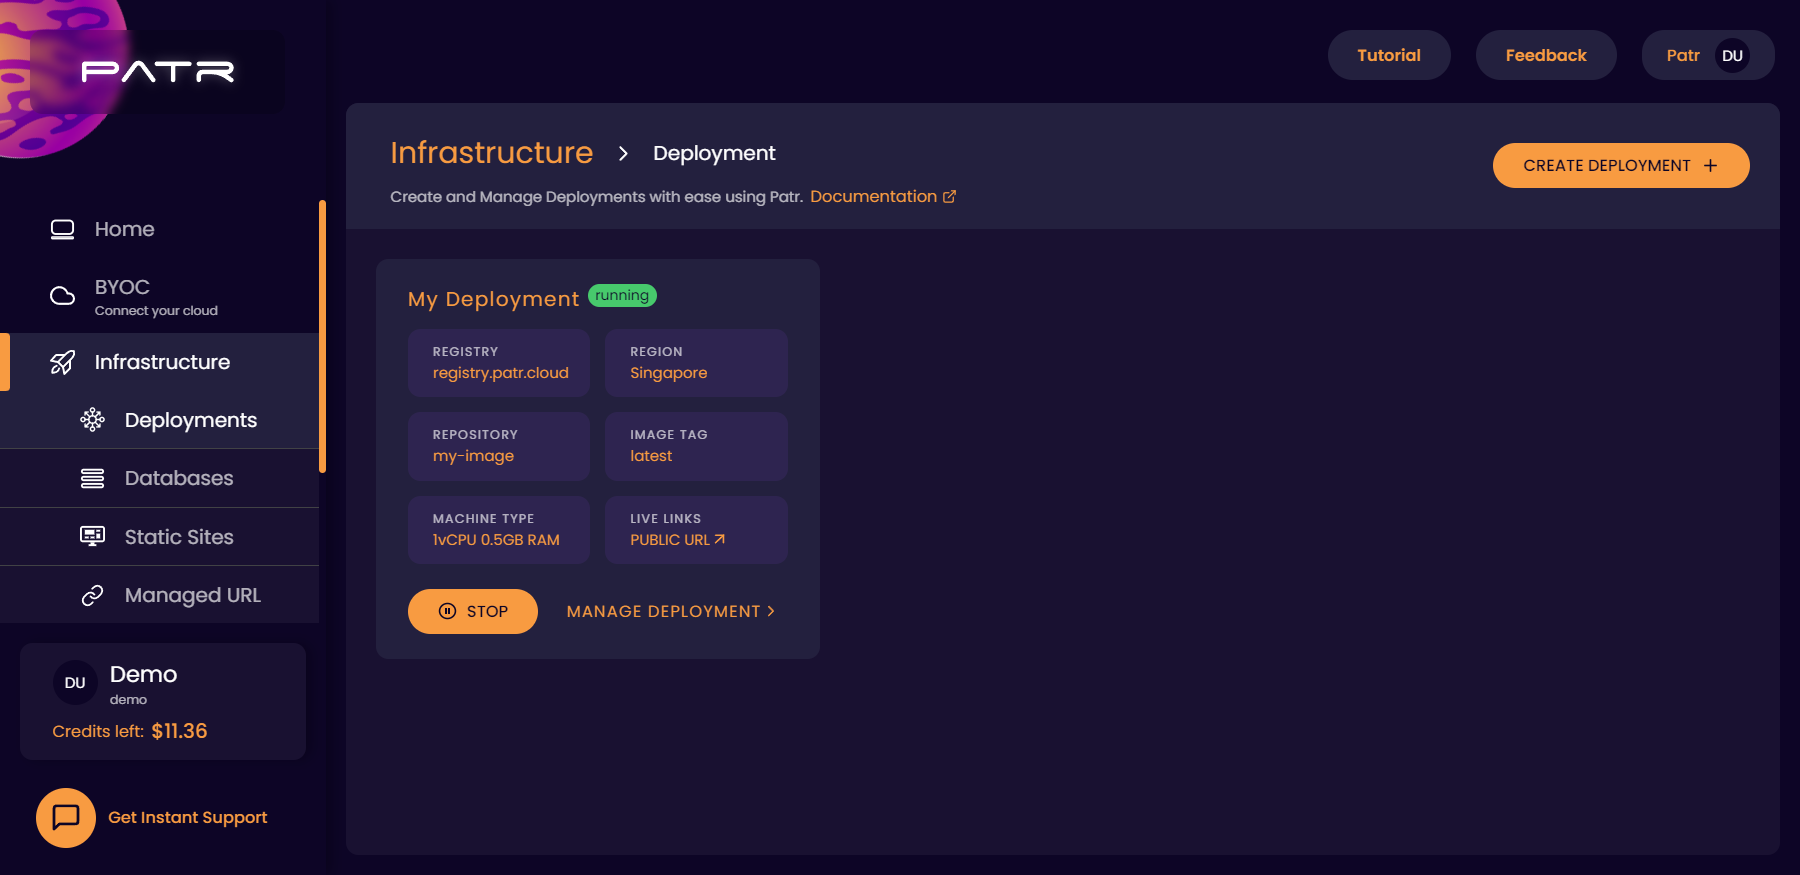
You can then click on the Public URL button to access the running Deployment.
Further Reading
Creating a Deployment
Persisting data across restarts
Creating zero downtime deployments